Tag Archives: Pinterest

Chalkboard Placemats (or Successfully Being Crafty!)

Thanksgiving this year is being held in La Jolla. My parents are renting a house and hosting it there. Since my parents are hosting and they are driving to the location, I offered to try to help out with whatever I could.

I was able to go out and get the tablecloth for the adult table as well as get some of the food things that my mom needed. But I wanted to see if I could do something really awesome.

I’ve seen so many pins on Pinterest about what you can do with chalkboard paint. I’ve always wanted to try one, but I never knew what exactly I should do.

But then I saw an idea about making placemats with chalkboard paint. The ones I saw on Pinterest were made out of a fabric placemat where someone glued posterboard on it and covered the posterboard with the chalkboard paint. But since I had seen some other ideas about using the paint on fabric, I decided to try it but skip a step.

First, I went to Bed Bath and Beyond to get the placemats. While I knew it didn’t really matter what pattern I bought since one side would be covered with the paint and I thought that some of the paint might seep through to the other side, I still got the matching pattern to the tablecloth I bought.

Then I went to OSH and had a nice chat with the employee in the paint department. He was actually super helpful and said that as long as I did thick coats of paint on the placemats, the regular chalkboard paint would work and I wouldn’t have to do any fancy primers on it. I got the regular chalkboard paint and had it done in black since I didn’t know if I would want to do a coordinating color to the placemats.

Finally, it was time to attempt the project.

IMG_4041

I got a bunch of ads from the mail and covered the concrete in front of my house with it. It’s really good that I did this step because I was a sloppy painter.

IMG_4042

The first coat of paint went on pretty nicely. I did it really thick and used a lot more paint than I thought I would. But I wanted to make sure that I covered the entire thing and none of the colors were showing through.

I let it dry for a day and then went to work on the second coat of paint.

IMG_4044

I didn’t have to do this one quite as thick, but I still wanted to make sure that there was good coverage over the entire placemat.

I let them dry for another day before I got out the chalk that I bought to see if these were a success.

IMG_4054

And as you can tell from the happy face I drew that they were! They aren’t super easy to wipe off, but if you get a damp cloth it isn’t too bad.

I’m excited to see how the kids like these at the kid’s table at dinner. I’ll have to do an update when I do my Thanksgiving dinner recap!

But at least these were a Pinterest win and not a Pinterest fail!

Pinning And Not Doing (or The Hazards Of Pinterest)

I’ve been pretty active on my Pinterest page lately. I’ve been pinning a ton of recipes and craft ideas and I’m super inspired to do all of these ideas.

Except I’ve done none of them.

I went back through the recipes that I’ve pinned lately and they all look amazing to me. I want to make all of those meals now. Some of them are even slow cooker recipes so I can cook them while I work (but I don’t feel comfortable leaving my slow cooker on while I’m not home yet).

But then I look at the ingredients and realize that I have to do a shopping trip just to get those things. I don’t keep a very stocked fridge or pantry, but I feel like  I have to do that so I don’t go crazy with food. So I can’t just “throw something together” because I don’t have the something to throw together.

I’m trying to do some planning about maybe going to get the ingredients on a day that I can make the dish, but then when I get to the store, I’m just motivated to get the things I usually eat (lots of salad ingredients and frozen chicken).

I’m not sure if my lack of motivation is due to not wanting to make the food or the cleanup involved afterwards. It’s also not motivating when I’m just cooking for myself. When I have company, I’m happy to cook.

Crafty ideas I’m getting a bit better about. I saw a pin about cute placemats for Thanksgiving. I went out and got all the things needed to make them and I’ll be working on them on the weekend (it involves multiple coats of paint so I want a day that I’m free to work on this). I’m much more willing to fail with crafty ideas than I am with food.

Everything looks so beautiful on Pinterest and not necessarily achievable by “normal” people. There are even websites devoted to Pinterest fail. I understand that with many things that are pinned on there, failure is almost inevitable because many pins are done by professionals.

I just have to get over myself and take the risk at making these foods I’ve pinned and maybe I can become a Pinterest success story!

At Home Manicure Time (or I Actually Made My Nails Look Cute)

As much as I am a girlie-girl, I’m not very good at doing beauty things. I just didn’t get the hair and makeup gene. I can do basic things, but usually when things are more than using concealer or putting my hair in a ponytail I’m pretty much a failure.

When I was in college, I used to get my nails done fairly regularly (maybe every other month or so). Back then, $10 manicures weren’t much since I didn’t really have bills to pay. Nowadays, I can’t afford them (especially since they seem to chip right away), so when I do get my nails done, it’s a pedicure not a manicure.

But I still like my nails to look nice, so I’ve tried to do at home manicures. Normally it looks like a 5-year-old coloring outside the lines. So I pretty much stick to just putting some top coat on my nails so they are shiny (and a little stronger since my nails tend to peel).

But a while ago, I saw an idea online to make patterns on your nails using blue tape (also known as painters tape). So I decided to try it out and it worked really well!

Here’s what you’ll need:

IMG_2976

Base Coat, Top Coat, Color of Choice, Blue Tape, and Decorative Hole Punch.

First step is to do a basic base coat on all of your nails.

IMG_2977

Next, tear off some of the blue tape and use your decorative hole punch (mine was a star shape) to punch a hole in the middle of the piece of tape.

IMG_2978

Then, put the tape on the nail that you want to have the design on. Press the tape down so there are no air bubbles next to the hole (that would ruin the design).

IMG_2979

Take the nail color of your choice (mine was a silver glitter) and paint over the piece of tape. I did 2 coats because I wanted it to be very sparkly.

IMG_2981

Then you need to let the colored polish dry. And once you think it’s dry, let it dry for a few more minutes. If it’s even a little bit wet still, the borders of the design aren’t going to stay clean. Trust me on this. I made that mistake on my first attempt.

After the polish is dry, peel off the blue tape and you can see if you need to do any touch-ups.

IMG_2985

I thought that it looks pretty good as it was, so I didn’t do any touch-ups. Also, I’m sure if I tried to do a touch-up, I would screw up the design.

After the touch-up, paint all your nails with a coat of topcoat. You might have to do 2 coats on the nail with the design for it to feel smooth.

That’s it! I have another decorative hole punch that make a heart design (I bought the set on Amazon), but I’ve also seen a design that uses a bandage to make polka dots on your nails (I might try that one in the future).

While I might never really be able to do a full at home manicure, at least I can feel cute and girly with designs on my nails.

Dot Art Mugs (or A Pinterest Win!)

I haven’t had the best luck with being able to create things I see on Pinterest. And the things I’m able to do aren’t necessarily the most impressive things (when I was sick, I combined an empty tissue box with a full one to have a trash can in easy reach).

But when I saw this blog pinned on Pinterest, I thought that maybe I could do the dot art mug. And I’m happy to say that it was a success!

It’s a super easy craft, but I think it look pretty impressive, as you’ll see at the bottom of this post. And you don’t need too much to do it.

IMG_2478

First, you need a plain mug. I bought this one at a kitchen supply store, but I think I’m going to look at IKEA for more. You also need a sticker to create the negative space. And finally you need an oil-based Sharpie (you can buy these at craft stores, just look for the marker to say “oil-based”).

To start, I put the “J” sticker on the mug where I wanted the plain space to be.

IMG_2479

Then using the oil-based Sharpie, I put dots all over the sticker, putting more dots closer to the sticker and putting them farther apart the farther I got from the sticker.

IMG_2480

I then let the marker dry for about an hour before removing the sticker. I would recommend waiting longer as my dots got a little smudged.

IMG_2481

The final step (which I haven’t done yet) it to put the mug in a cold over, turn it on to 350, and letting it bake for 30 minutes. I’m going to do a few more mugs before I bake them (might as well be energy-efficient!).

I did a second mug after my “J” one and I think the heart looks even better!

IMG_2482

I’m thinking of maybe making some of these for anniversary gifts (sorry to spoil the surprise for anyone who might get one from me).

And if you don’t want to do dot art, you can still follow all the same steps to make a custom mug/plate/bowl/serving dish. The possibilities are endless!

And now I have something crafty to keep me busy while I’m out of work!

Trying To Be An Organized Packer (or Another Bit Of My OCD)

I spent this past weekend in Lake Tahoe with my parents (and my dog) to celebrate my birthday. I promise to have some Tahoe recaps (and photos) coming up this week, but first, I wanted to share some of my travel tips. Particularly when it comes to packing.

I don’t think that I’m an expert packer, but I’ve picked up some helpful ideas over the years. And when some of my friends traveling with me have seen these in action, they always comment on how they should use them too.

First of all, I try to keep all of my travel stuff in one location in my house. In my storage area behind my kitchen, I have my suitcases and all my travel toiletries stored. This way I can just grab them together. I keep my toiletries packed (one bag for liquids and one for non-liquids due to TSA rules), so I only have to grab those bags and not have to pull everything together.

DSCN0315

I also make a note if any of my toiletries run out on a trip so I can get a new one and put it in my bag as soon as I’m home. This way I can prevent last-minute CVS runs for a travel size toothpaste or contact lens solution.

For almost all of the trips I take, I only bring a carry-on bag (this will change for the Hawaii trip). So I have to be pretty mindful how I pack.

I always wear my bulkiest shoes on the plane, so they don’t take up room in my suitcase. And I try to only pack one other pair of shoes in my suitcase. I broke that rule on this trip because I just got some new barefoot-style sneakers (they look normal sneakers and not like barefoot shoes with toes). So I packed those up too so I could start wearing them in.

The best way I’ve found to pack shoes is to put them in shower caps. This way the dirty bottoms are covered and won’t get your clothes messy (thank you Pinterest!)

DSCN0314

Aren’t my new barefoot sneakers cute! They are by Merrell and I got them $30 off at Off Broadway Shoes!

I know that some people believe in packing each outfit in its own bag, rolling clothes to save room, or laying all their clothes on top of each other and then folding it as one piece. I’ve tried those all, and they don’t really work for me.

My favorite way to pack clothes is what I like to call puzzle packing. I put one layer of folded clothes in my suitcase. Then I start on the next layer, trying to fill in all gaps and maximizing the spaces (fitting things together like puzzle pieces).

Once I got all my clothes in, my suitcase looked like this:

DSCN0317

Inside are 2 pairs of shoes, socks and underwear, a dress, a sweater, a tank top, yoga pants, a workout top, a t-shirt, a bathing suit, pajamas, and a hat. And there is plenty of room in there for my toiletries and other items I might add at the last-minute.

The final step to my packing is making my day-of list. This is my list of things that I have to do before leaving for the airport.

DSCN0323

After taking this photo, I realized I left about 4 items off this list. But mostly what it is are items that can’t be packed until the last minute (I need to wear my glasses at night so I can’t pack them until the morning, I want to be able to brush my teeth and put on makeup in the morning).

I know this is a little crazy, but it does help my anxiety about flying a bit. Also, I have yet to forget a major thing for a trip. Hopefully you will find some useful tips for your next trip. And if not, you just got a peak inside my crazy mind!

My Pinterest Fail (or Now What Will I Wear On Saturday?)

If you have been on Pinterest, I’m sure you’ve seen a pin about turning a t-shirt into a cute workout tank top (like this). I’ve seen it a ton of times, and have been looking for a good excuse to try it.

I was going to do it with my race shirt I got for the Hollywood Half 5K, but that ended up being a nice technical shirt, so I didn’t want to cut it up.

But next Saturday, I have the Revlon Run/Walk and I knew that the shirt would be a cotton one and perfect for trying this pin out.

I picked up my shirt after my work shift this past Saturday.

IMG_1760

No lines when I got there, so I was in and out!

As soon as I got home, I grabbed a couple of old junky shirts and tried out the tank top instructions. My first shirt was a disaster, but the second and third one came out ok (the shirts were a bit small for me, so I don’t have pictures of them).

After testing it out, I decided I was ready to do my race shirt.

I put the shirt out on my bed.

IMG_1763

I cut off the collar.

IMG_1764

I cut off the first sleeve.

IMG_1765

I took the cut off sleeve and used it as a pattern for the other sleeve (so they’d be even).

IMG_1766

(it was way more even than the picture looks)

Next, I flipped the shirt around so the bottom was toward me and cut off the bottom hem.

IMG_1768

I don’t have a picture of this next part, but I cut the stitching away from the bottom hem that I cut off (so all I had left was a strip of shirt with no thread). Then I stretched it out to make a long shirt string.

Next, I flipped the shirt over so I could cut a v shape out of the back.

IMG_1769

Then I wrapped the shirt string around the v in the back to make it a racer back top.

IMG_1770

So far so good, right? Wrong.

I try on the shirt and it looks like this.

IMG_1773 IMG_1771

The sides were cut away too much and the back was cut way too low. I couldn’t figure out how I made such a mistake!

Finally, I realized it. All the shirts I used before fit me snuggly. So when I cut the sleeves off to make the arm holes, I followed the stitching on the sleeves. But since this shirt was big on me (I probably should have gotten it a size smaller), the sleeves were big and cutting around the stitching made the holes way too big.

I could still get away with wearing this shirt with a tank top underneath, but I don’t like how the back fits at all. Maybe I could sew it a bit so it doesn’t hang so low.

But I’m probably not going to wear this shirt to the event now. In the past, I always wore my race shirt on race day, but lately, I’ve been having a bit more fun with my race outfits.

I might wear the Superman shirt I wore for my last 5K, or maybe just a pink tank top. But after this crafting fail, I really don’t want to have to wear this shirt and have people who don’t read this blog see how badly I did!

Blogger Cookie Exchange (or Why I’ll Have A Sugar High For Weeks)

After all the sadness on Friday, I was glad that I had something fun to look forward to this past weekend. I had previously attended the Blognic, and the same group of bloggers decided to organize a blogger cookie exchange!

The deal was that we would all make 6 dozen of our favorite cookies, bring them to the event, and we’d leave with lots of different types of cookies to enjoy over the holidays! I had never been to a cookie exchange before, but I was in.

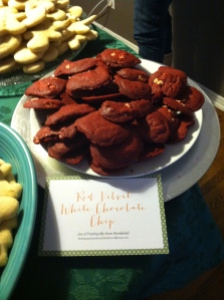
I searched Pinterest for easy to make holiday cookies, and I found a recipe for Red Velvet White Chocolate Chip cookies (recipe to come tomorrow!). The recipe involves cake mix, so I figured it couldn’t be too bad.

I made my (almost) 6 dozen and brought them to the event on Sunday.

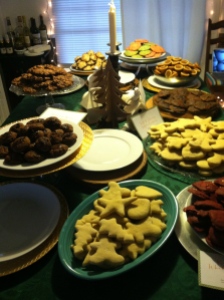
The cookie exchange was held at Amanda from LoveCreative‘s house. And I have to say that she has a gorgeous house and did an amazing job decorating it! The cookies looked pretty amazing too.

IMG_1209IMG_1211


Amanda even set up a hot chocolate bar (I added marshmallows but skipped the candy cane and Bailey’s)!

IMG_1212

I enjoyed getting to spend some time with all the bloggers and getting advice from them all. I also enjoyed having some fun back in my life.

I had to leave the cookie exchange a bit early because I had my final night of Porter Kelly’s commercial acting class, so I filled up my to-go box and headed out the door.

IMG_1213


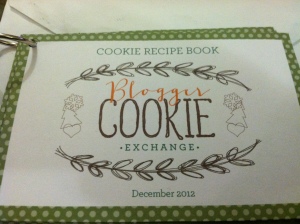
Also, Amanda had collected all the recipes for the cookies ahead of time, so we all got to take home a super cute recipe book!

IMG_1214


Thank you so much fellow bloggers for welcoming a blogging newbie! I’m really looking forward to fellow blogging events! And if you are a blogger and want to be invited, let me know!

And just so you can learn more about all the fabulous ladies who attended, here are all of their blogs:

Rachel (Lupa & Pepi)

Jennie (Garlic My Soul)

Kelly (Studio DIY)

Sarah (Very Sarie)

Amanda (LoveCreative)

Irene (Design Stiles)

Mindy (Budget Fairytale)

Jessie (You & Me Events)

Amanda Jean (Jean & Gene Creative)

Just Because I’m Not Skinny Doesn’t Mean I Don’t Want To Look Cute (or More Shopping Drama)

I’ve talked before about hard tough it can be to shop when you aren’t skinny. I’ve also talked before about my love of Pinterest.

I love searching the boards on Pinterest for tons of stuff. One of my favorite sections is the Women’s Fashion section. There are so many ideas for clothes. Some of them are craft ideas with clothes (I totally want to make this sweater!). Some pins are about accessories.

But most of the pins are of really cute outfit combinations. I would totally rock any of those looks.

But sadly, until I lose weight and fit into a “normal” size, I won’t be able to create those outfits. There are a few stores that carry clothes in my size. Even fewer that carry pants or jeans that are both plus size and petite. And unless I want to order things online and take a chance on it fitting, I have only select stores that I can go to.

I am not trying to sound like a victim. I know that it is my fault that I am this size. I haven’t gotten control over my eating disorder yet. I hope that one day, the eating disorder will be a distant memory (although I think I’ll always have disordered eating habits).

But until that day, I need to still cloth myself and I’d like to look cute. I’m single, young(ish), and trying to live a full life. But when most of the clothing options for me are either very old-looking or something that maybe a middle schooler would wear, it’s tough to look how I’d like.

I’m thinking about seeing about testing out a personal shopper (you can use one for free at Bloomingdales). I might not purchase the clothes, but at least I can get an idea of what I should look for in other stores. Or maybe I can say that I’d like to look at clothes that are mainly on sale.

I don’t think I’ll have time to do too much shopping before I’m (f)unemployed, but maybe this could be something to look forward to in the new year.

Pinning Freak (or I’m Going To Turn Myself Into Someone Crafty)

I’m totally addicted to Pinterest. I know a lot of people who are as well.

I’m always pinning awesome recipes, beauty ideas, organizational tips, book suggestions, and even ideas for the future like wedding or baby things. I’m hooked.

I love seeing all the cute baby things that my friends with babies are pinning. And my future sister-in-law is now on Pinterest pinning ideas for their wedding.

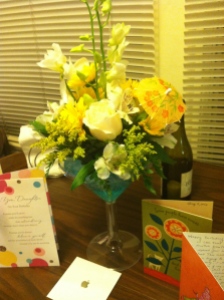
A lot of the time, I’ll email my dad some of the things that I’m looking at since he is very crafty. And we have done some projects that we found on Pinterest. One of the big ones is cutting the bottom off of wine bottles so you can put candles underneath. Cutting off the bottom of the wine bottle is pretty tough. I believe my dad has been able to successfully do it 2 or 3 times. I don’t have a great photo of what the wine bottle candle holder looks like, but you can see it behind my birthday bouquet in this photo.

IMG_0886

I wish I was crafty enough to do most of the things I see. Just today, I saw a pin on how to make your own glitter tights (perfect for New Years Eve!). If I made them, the tights would probably get glued together and somehow I’d get glitter glued to various surfaces in my house (even if I did the project outside).

So I’m going to start small with my crafty projects from Pinterest. There are a bunch of recipes that I’m going to try soon (and I just got a CrockPot so that’s pretty awesome!). And I found directions on how to make your own dry shampoo for dark hair. I could probably do that without too much craziness.

I know that I’ll probably never been as crafty as the ideas I see, but I’m going to take some baby steps and maybe one day I’ll get close to that. In the meantime, I’m excited to pin silly things like travel ideas, quotes that I like, blogs that I like, and ideas for a dream home in the future.

Oh, and if you want to follow me on Pinterest, you can do so here.